Slow Cooker Goodness!

Standard

My wife found this recipe for us to try, Balsamic Vinegar Pork Tenderloin/Roast. I must say it came out waaaaay better than I thought. If I haven’t mentioned it before, my wife is very picky and will only eat certain things. She’s getting better with my help though! Found this recipe for the crock pot. She was going to be working all day and I had errands and house work to do so I figured I could get it set up that morning and by the time she’s off it’ll be ready. Best recipes involve doing nothing except putting everything in a pot and let it sit ;). The roast came out very tender and juicy, I definitely recommend setting your crock pot on high heat (4 hours) and let it sit for about 5 hours.


Ingredients:

2 lb. Pork tenderloin (for 2 people we had leftovers)

1/2 Cup balsamic vinegar

1/4 Cup worcestershire sauce

Splash of soy sauce

6 Cloves of garlic (minced)

2 Cups water

1 Teaspoon black pepper

Salt to taste


Prep And Cooking Steps:

Place the tenderloin in the crock pot. Add your balsamic vinegar, worcestershire sauce, soy sauce, garlic, black pepper, salt, and water to the pot.

Gently mix and baste roast.

Put heat on high level and let sit for 4-5 hours. Occasionally stir. (Thickest part of roast needs to be about 160 °F)

Slice pork and serve with sauce.

Image


Apple Pie

Standard

Hello once again! Sorry I have been away so long. Been ultra busy and have been forgetting to take pics and log in my daily home cooked meals. I’ve got a few I logged, but haven’t post yet, so I’ll post those over the next couple of days.

Just some updates: Got through our little winter storm the beginning of this month. Power was out for about 10 hours, no biggie. Wife and I are going to put up a fence in our backyard so our dog will be able to roam freely from his leash when he needs to go out and can burn off some of that energy outside rather than in the house. Tomorrow will be our first year married to one another (but we’ve been together for four years now) and first year in our house (we bought our house a week before our marriage, stressful couple of months that was!) So definitely looking forward to some type of vacation here soon.

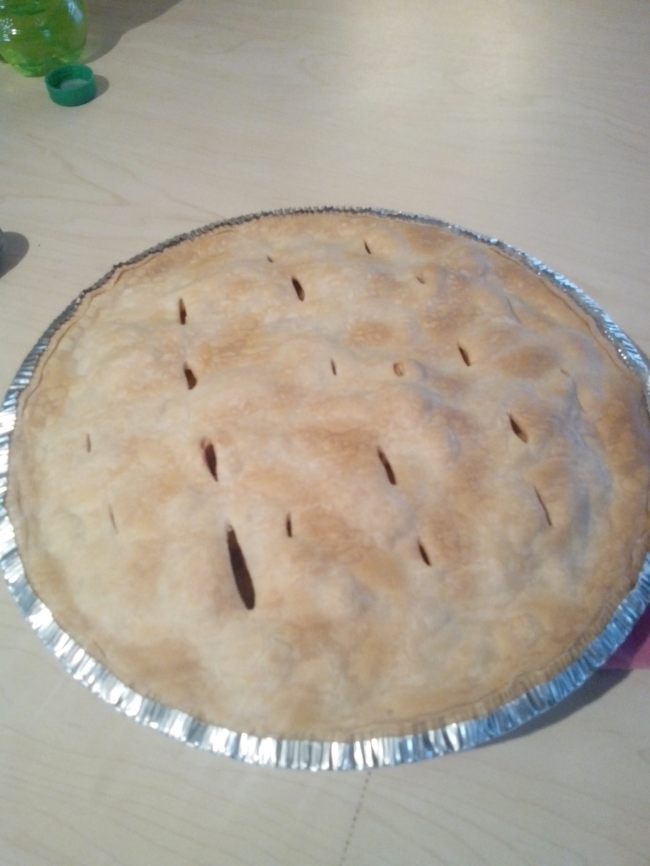
I went to my best friend’s baby shower (we’ve known each other since 4th grade) and along with gifts, I wanted to bring some type of food and thought hey! I should try baking a pie. I have never baked an Apple Pie before. My wife is a pastry and baking chef, she graduated from Johnson & Wales University. Having said that, she didn’t teach me how to do this before hand or help as she was at her cousin’s baby shower in Florida the day I had to make it. She sent me helpful texts though. Since not having the time and experience in making my own dough, I decided to use store bought. Hate on it all you want, and in the words of a good friend, “I’m not a bakist!” 😛

Ingredients:

5-8 Apples (peeled and cut) I used regular red apples, note that granny smiths hold more water, pink ladies are good to use too!

1 Package of rolled pie crusts (comes with 2 rolls)

1/2 Cup white sugar

1/2 Cup light brown sugar

1/4 Cup cinnamon

Pinch of nutmeg


Prep and Cooking Steps:

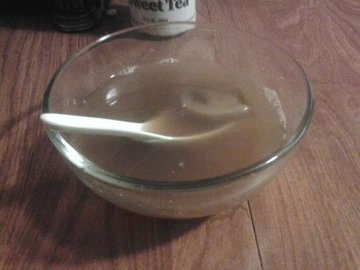
Cut and peel your apples and place in a bowl with ice and water. Helps reduce browning.

Preheat the oven for 375 degrees.

In a separate bowl, combine both sugars, nutmeg, cinnamon, and drained apples. Mix gently.

Roll out one crust and place on bottom of your pan. Trim an inch off the top from the rim of the pie pan. (Forgive me for not knowing the proper way to do the pie edge, this is what I was told).

Spoon mixed apples into pie pan.

Roll out the second crust. Place on top of the pie pan and trim ends. Fold trimmed edge of bottom crust over ends of strips, building up a high edge. Seal and flute. (I didn’t know how to do this so if you’re like me, you can easily just pleat together and it’ll seal).

Make slits in the pie so it can breathe. Place in oven and let it bake for 45 minutes to an hour. Note: If you notice that your crust is getting too dark, place some tin foil over it, I did after about 10 minutes of baking.

Extra bakist points: You can take some leftover cinnamon, nutmeg, white sugar, and brown sugar and mix together and then lightly coat the top of the crust, it will brown a lot better.

After you take it out of the oven, it will be LAVA hot! Enjoy!Image


Burgers And Fries

Standard

A great combination that has been around since the beginning of the 20th century. Always a favorite food and you can get one within 5 minutes in just about every city, whether at McDonald’s, Burger King, Wendy’s, Groucho’s, etc.. Home made burgers and fries are always 10x better than any chain restaurant. Unfortunately you won’t get it as fast, but hey, quality over quantity! Mostly they end up being a little more healthier for you, so that’s a plus. Fresher ingredients make it tastier. We ended up making Turkey Burgers And Seasoned Fries so enough of this shenanigans, let’s get started!

Turkey Burger Ingredients:

1 1/2 Pounds ground turkey (or beef)

1/4 Cup onion (minced)

1/4 Cup fresh parsley (chopped)

1 Clove garlic (minced)

1 Teaspoon salt

1/4 Teaspoon black pepper

Prep And Cooking Steps:

In a large bowl, combine turkey with garlic, salt, pepper, parsley, and onion.

After mixing well, form into 4-6 patties.

Cook on a grill or gridlle, about medium to high heat. After browning, flip over, add a piece of cheese on top, and cook until done.

Seasoned Fries Ingredients:

2 1/2 Pounds russet potatoes (peeled)

1 Cup all purpose flour

1 Teaspoon onion salt

1 Teaspoon garlic powder

1 Teaspoon salt

1 Teaspoon paprika

1 Cup water (or as needed)

1 Cup vegetable oil

Prep And Cooking Steps:

Slice potatoes into french fries and place into cold water so they don’t turn brown.

Heat oil in a large skillet over medium-high heat. In a large bowl combine the flour, onion salt, garlic salt, salt, and paprika. Gradually stir in enough water so that the batter isn’t as thick. (Be sure to dampen the french fries after you take them out of the water so that the batter doesn’t just run off of them. They need to be dry for the batter to stick.)

Dip french fries in batter one at a time, and place in the hot oil. The fries will clump up and stick together if there are more than one in the oil at a time.

Fry until golden brown and crispy. Remove and place on papertowels to drain.

You are all set! Go enjoy some food!

Image

Crock Pot Cheesy Chicken Spaghetti

Standard

Yes, you read that correct. My wife being the biggest lover of cheese and pasta dishes, you can see how I couldn’t go wrong with this. After coming home from a bad day at work, this cheered her right up! A different twist on spaghetti, and you can still serve garlic bread along with it. Very filling and takes about 3 hours on low heat in the crock pot to cook. Very simple too, basically add all the ingredients into the crock pot and you’re ready to go. The cheese will get very thick and surprisingly isn’t too overwhelming. This recipe feeds about 3-4 servings and makes awesome leftovers if you don’t finish the first time. Let’s see what we need and hop to it!


Ingredients:

1/2 Pound boneless skinless chicken breast (cubed)

1 Pound velveeta pasteurized process cheese product (cubed)

Half a package of spaghetti noodles

1 Can diced tomatoes (undrained)

1 Can cream of mushroom soup

1 Can cream of chicken soup

1/2 Cup water

Salt

Pepper


Prep And Cooking Steps:


Cube the chicken breast and season lightly with salt and pepper.

Cook in a skillet till golden brown and then add the chicken to the crock pot.

Cube the velveeta cheese and add to the crock pot.

Combine mushroom soup, chicken soup, chicken, tomatoes, water, and two teaspoons of salt and pepper to the crock pot. Adjust to low heat (8 hour or 10 hour depending on brand of crock pot). 

Now start boiling your spaghetti noodles. When done, drain and add to the crock pot.

Stir and mix well. Let the crock pot sit for 3 hours until spaghetti has thickened, stirring occasionally. After 3 hours, it’s all ready. Grab a plate and enjoy!

Image

Chicken à la Kimmy & Beignets

Standard

Hello, all! Back to some delicious eats this week. Over the weekend my friend, Kim and I made her very own chicken pasta and some sweet beignets. We had a hearty helping of pasta and then made room for dessert. Lots of leftovers too, the chicken pasta dish alone can feed 4-6 people. I’ll go ahead and list what you need for the Chicken à la Kimmy.


Ingredients:

2 lb. Boneless & skinless chicken breasts (cubed)

2 Cans diced tomatoes (undrained)

1 Cup heavy cream

1 Pack fettuccine noodles

2 Tablespoons butter

Garlic powder

Salt

Pepper


Prep And Cooking Steps:

Preheat oven to 375 degrees.

Cut up the chicken breasts and season with salt, pepper, and garlic powder. Cook until golden brown in a skillet. (I didn’t use any oil).

Add the undrained tomatoes and heavy cream with a tablespoon of butter into the skillet with the chicken. Set on medium heat and let it simmer while you cook the noodles.

Boil the fettuccine noodles until done, drain, then put them back in a stock pot and a tablespoon of butter and add a little bit of garlic powder.

Now combine the chicken and tomatoes into the stock pot with the noodles. We will now use a large casserole dish and pour all of the chicken and noodles into the casserole dish. Even it out across the surface and add mozzarella cheese on top.

Bake for about 10 – 15 minutes, whenever the top is a light golden brown and bubbly.

You’re all set! Caution: LAVA HOT!

IMG_20140125_182310


Now for those Beignets!


Ingredients:

2 1/4 Teaspoons active dry yeast

2 Eggs

1 Quart vegetable oil

7 Cups all purpose flour

1 Cup evaporated milk

1 1/2 Cups warm water

1/2 Cup white sugar

1/4 Cup shortening

Confectioners’ sugar

Salt


Prep And Cooking Steps:

In a large bowl, dissolve yeast in warm water. Add sugar, salt, eggs, evaporated milk, and blend well.

Mix in 4 cups of the flour and beat until smooth. Add the shortening, and then the remaining 3 cups of flour. (Do not overmix). Cover and chill for up to 24 hours.

Roll out dough 1/8 inch thick. Cut into 2 1/2 inch squares. (Remember to keep the rolling pin and whatever surface you are using to roll out the dough floured well).

Heat the oil in a frying pan and let it get hot. Then start frying the beignets, we did about 5 at a time and be sure to bast them on both sides with the oil as they pop up. This will cause them to fully rise. Takes about 5 seconds until they are done. (If the beignets do not pop up, oil is not hot enough).

Drain them onto a paper towels and then shake confectioners’ sugar over them. (We eyeballed it, doesn’t have to be a lot.)

Served warm and they are delicious so eat up!

IMG_20140125_182253


Akemashite Omedetou!

Standard

So, now back to the grind this week. Going to stick to blogging and not slack off, well maybe, lol. One of my cravings kicked in the other day and I realized I haven’t made this soup in about a year. When I make it I usually pair it with sushi or stir fry, but you could pair it with the pot stickers I made on my first post ;). Japanese Onion Soup is a little salty and has a good bit of flavor. Most Japanese hibachi restaurants have it as an appetizer before the main course, a bowl of clear onion broth with mushroom and chives. I don’t make it all that often since my wife dislikes mushrooms and onions, so without those key ingredients it obviously won’t work. Again, this is another good recipe that you can improvise on. This recipe takes about an hour and a half from prep to cook. Let’s get started!

Ingredients:

1 Package fresh chopped shiitake mushrooms

1 Package fresh chopped baby portobello mushrooms

2 Quarts water

2 Tablespoons chicken stock

1/4 fresh garlic (minced)

1 Teaspoon fresh ginger root (grated)

1/2 Carrot (chopped)

1 Small onion (chopped)

1/2 Stalk celery (chopped)

3 Beef bouillon cubes

Fresh chives (minced)

Prep And Cooking Steps:

Get a large stockpot, combine the onion, garlic, celery, ginger, carrot, half of the mushrooms, water, chicken stock, and the bouillon cubes. Adjust to high heat, let it get to a rolling boil.

Once it reaches boiling, cover and reduce to medium heat. Let it sit and cook for about 45 minutes to an hour.

Get a large pot and place all the remaining mushrooms in it. When the boiling soup is done, place a colander over the pot with mushrooms. Strain and discard the remaining ingredients from the stockpot.

Add fresh chives to taste and the soup is now ready to serve. Enjoy!

Image

Just A Slacker

Standard

Ahhh!  I’ve been slacking like crazy the last few days about this blogging. Well I finally got around to it today. This dip is my own twist on a Chile Con Queso. I like my queso with a lot of heat. You can opt out on some of the chilies/jalapenos and you can use alternative cheeses and add a mild salsa mix if you like to make it not so spicy. I have also used different versions of this dip, like adding onions, mixed cheeses, and bell peppers/banana peppers. However, today we will use a simple recipe that you can throw together in minutes and your choice of either stove top or microwave. I didn’t measure for this, I just kinda go by how much of what I got, but having a good cheese to chili ratio makes it taste amazing. 

Ingredients:

1/2 Package white american cheese (cubed) Side note: I actually used Monterrey Jack in the picture, but whatever you want to use, go for it

1 Can of chopped green chilies (undrained)

1/2 Can of chopped chipotle chilies (drained)

1/4 Jar of jalapenos (undrained)

1/2 Cup sour cream

2 Tablespoons butter

1 Can diced tomatoes (drained)

Prep And Cooking Steps:

Depending on how you want to cook this, I suggest stove top, but if you want to be lazy you can throw everything into a bowl, mix well and microwave it for 3 minutes. Stir, then microwave it again for another minute and a half. You’re good to go.

For stove top, add butter to the pot and cook on low.

The butter will melt and then you can add in the sour cream.

Let it get creamy and then add the tomatoes, jalapenos, chilies, and now stir.

Add the cubed cheese and adjust to medium heat. You want to stir it well, but do not put the heat level above medium heat as you don’t want to burn any of the chilies. As it starts to bubble, adjust back to low heat and let it sit for 5-8 minutes until its nice and thick.

It’s ready to be devoured, bust out some tostitos chips and eat up!

Image

Soup For Comfort!

Standard

Hello once again! Well since we’ve had nothing but bad weather around here for the past week with all this raining and thunderstorms, I say let’s go with some comfort food. Hot filling soup is the best on a cold rainy day. This recipe is a replica of Olive Garden’s Chicken & Gnocchi Soup. Very creamy and takes about an hour to cook. I actually did measure for this one so I’ll lay it all out and let you be the judge. Let’s get started!

Ingredients:

1 lb. Boneless chicken breast (cubed)

1 Small onion (diced)

2 Cloves of garlic (minced)

Bag of gnocchi

3 Celery stalks (diced)

2 Carrots (diced)

4 Cups chicken stock

Bag of baby spinach leaves

2 Cups  half & half cream

Salt

Pepper

1 Tablespoon Olive Oil

Prep and Cooking Steps:

You’ll need a big pot because this makes about 4-6 servings. In the big pot you can go ahead and throw in the chicken stock and let it cook on low heat.

Get a frying pan and you’ll add the olive oil and cook the onion, garlic, celery, and carrots until they are translucent. (Takes about 5-7 minutes).

Then transfer the vegetables to the pot of chicken stock.

Now add your cubed chicken to the frying pan and cook until light brown.

Then stir the chicken into the big pot and and bring it to a simmer (adjust to medium heat).

Stir the gnocchi into the simmering pot and cook until they begin to float, 3 to 5 minutes.

Add the spinach to the soup and cook until wilted, about 3 additional minutes.

Stir in the half and half cream and cook until the soup thickens.

Finally season to taste with salt and pepper and let the soup sit to cool down.

Ready to serve and enjoy!

Image

Good Eats – Pot Stickers!

Standard

Welcome to my blog! My name is Brad and I started this blog for sharing food and drink recipes to those who love food like me. In the last several months, my wife and I have strayed away from fast food to save money and for our health benefit. It has been a great change in our diet and my wallet, haha. Honestly I can’t remember the last time I stopped at a fast food joint because we cook so much now. We have learned that we enjoy cooking more and we have created some pretty awesome dishes just from simple recipes. We have friends come over and we trade recipes and we may cook one night and then they’ll cook the next. We feel that it brings people together and we enjoy that. The best thing about recipes, you can alter it to your taste preference and I enjoy talking about food to other people with different taste palates.

Now for our first recipe: Pot Stickers! Or Chinese Dumplings, depending on what you call them. I love Asian foods, and I find that I can’t find any Chinese/Japanese restaurants around the area that I live that fry their dumplings, it’s always steamed/boiled. We pretty much took a basic recipe and winged it. We made about 35 of these, for 4 people as an appetizer. They were delicious and we nailed the flavor. The caramelized wrappings brought out the steamed flavor of the meat and it was just amazing.

Ingredients:

Half head of cabbage

Carrots

Ground Pork

Won Ton Wraps

Soy Sauce

Garlic Powder

Salt

Pepper

Vegetable Oil

Prep And Cooking Steps:

Put ground pork into a large bowl. We will use this to mix the ingredients.

Finely shred carrots and cabbage and put into the mixing bowl with the pork.

Add a pinch of salt and pepper. Season to taste with garlic powder and soy sauce. Mix well. (We used about 3 teaspoons of soy sauce and a pinch of garlic powder)

Get a small bowl and add water, you will use this to dab your fingers in to maneuver the won ton wrappings. Also note when you open the wrappings, you need to place a damp paper towel over them so they don’t dry out. If they dry out, they become very hard to close and pleat with the filling inside.

Here comes the tedious part, take a wrapper and put a spoonful of the filling in the center of the wrapper. Don’t over stuff or they will fall apart when you are boiling them. Dab your fingers in the water and close the wrapper around the meat and pleat. You may have to keep dabbing your fingers, the water will help the wrapper stick together so the meat won’t fall out.

Boil a pot of water. Put the pot stickers into the pot and boil until they are translucent. When they’re translucent, take them out and set aside.

Put the boiled pot stickers into a frying pan and fry them in vegetable oil until golden brown/caramelized.

They are ready to serve and enjoy!

IMG_20140101_173710